

やってきたのは SnapLite です
「LED スタンド」…なのですが、新製品の LED スタンドです。ScanSnap をリリースしている PFU の新製品 LED スタンド、SnapLite を買ってしまったのです。
SnapLite は思ったより大きい箱に入ってきました。もう少し小振りなのかと勝手に思っていました。

早速開封してみます。ウレタンスポンジにはめ込まれた本体と箱が一つ、というシンプルなパッケージング。パッケージのレイアウトもいいですね。

リスが可愛い、この箱の中にはACアダプターが入っていました。

取り出した本体。見た目はとてもすっきりしていて、華奢なくらいに感じるのですが、実際のものはすごくしっかり作られていて安心感があります。
スタンドのトップに iPhone を置くための台座があります。

このように載せて使うんですね。

abicase を着けたままでも大丈夫です。

スタンドの台座部分には電源スイッチとスキャンボタンがあります。このスキャンボタンを押すと Bluetooth で接続された iPhone のシャッターが切られるという仕組みになっています。

ここが LED ランプ。暖色と白色の 2 つの LED を搭載しています。本を読んだりする時には白色を使いますが、間接照明的に使うなら暖色 LED もイイ感じです。

AC アダプタを繋ぐと台座部分のリスが光ります。こういうボタンの部分などは、単純に丸く光らせてしまいがちですが、きちんとリスの形に光っているのには感動しました。

実際にブツ撮りをしてみるとこんな感じのイメージになります。写真だと見えませんが、撮影できるエリアはレーザーでガイドラインが出ています。

レーザーが出ている範囲を無理やり写してみました。こんな範囲が撮影範囲になります。

実際に撮影した写真がコレ。SnapLite はブログ用のブツ撮りに使えるのでは?と思って買ったのですが、距離がありすぎてブツ撮りには向かないな、という結論。まぁ、トリミングして使うという方法もあるので、もう少し試行錯誤はしてみようと思います。

こっちは王道の使い方、書類の取り込み。

実際に取り込んでみたのがこちら(クリックするとオリジナルの画像を表示します)。

こっちは失敗したもの。テーブルと書類の境界を上手く判別できていません。

A3合成をやってみました。見開きの書類でも簡単にスキャンできるのは画期的だと思います。でも、テーブルが検出できていないんですよね。手でトリミングすることもできるのですが、iPhone の上でやるのはちょっと面倒。

そこで、スキャンする時に色画用紙を敷いてみました。以前ご紹介した色画用紙が大活躍するか?
写真撮影のバックに色画用紙、これはコスパ的に最強です
こんな感じに敷いてみて撮影してみました。

だいぶ良くなりましたが、まだ少し甘い感じです。

色画用紙を白にしてみたら、ばっちりです。白が良いのかもしれませんね。今度、白のテーブルクロスを買って敷いておこうか…

今回はファーストインプレッションということで、ざっくり使ってみましたが相当便利です。本とかCDジャケットとかの撮影には良さそうです。当初の目論見だったブツ撮りはもう少し研究してみたいと思います。
実際に使ってみて思ったのですが、SnapLite がスゴイのは LED スタンドではなくアプリなんですよね。スタンドは写真の自由度を制約することでアプリ側の精度を上げるための仕組み、という位置づけに思えます。合成モードもアプリが頑張っているのですが、その時に写真のサイズがあまり変わらないように同じ位置から撮影させるためにスタンドに載せさせているのでしょう。
ということは、これからアプリがもっと強化されれば色々とできることが広がる可能性がありとても将来性を感じました。また、SnapLite は Bluetooth で繋がっているだけなのであれば、他のアプリが連携したりできないのか?と思ったりも。
いや〜、これからが楽しみです。
そういえば、こんな可愛らしいステッカーも同梱されていました。もっと欲しいので、これ売って欲しいな(ステッカーマニアですみません)。

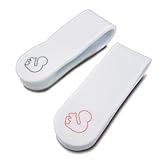
先着 2000 台には入れたみたいで SnapLite ロゴがプリントされた Cheero クリップが同梱されていましたよ。

お手軽スキャンの SnapLite、皆さんもお一ついかがですか?

先着 2000 台のノベルティは終わってしまったのかもしれませんが、SnapLite の Cheero Clip も購入できます。
最後まで読んでいただきありがとうございます。
 左のアイコンをクリックして、このブログを Feedly に登録していただけると嬉しいです
Facebook ページでも情報を発信していますのでよろしかったら「いいね!」をお願いします
RSSリーダへの登録は こちら からどうぞ。
コメントを残す